I am sorry.

Hey everyone,

I owe you all a sincere apology. I disappeared, and that’s not okay. Depression is a real struggle, and it hit me hard over the past year. Trying to navigate life after the pandemic was tougher than I anticipated, and things started slipping away from me, especially in the last six months.

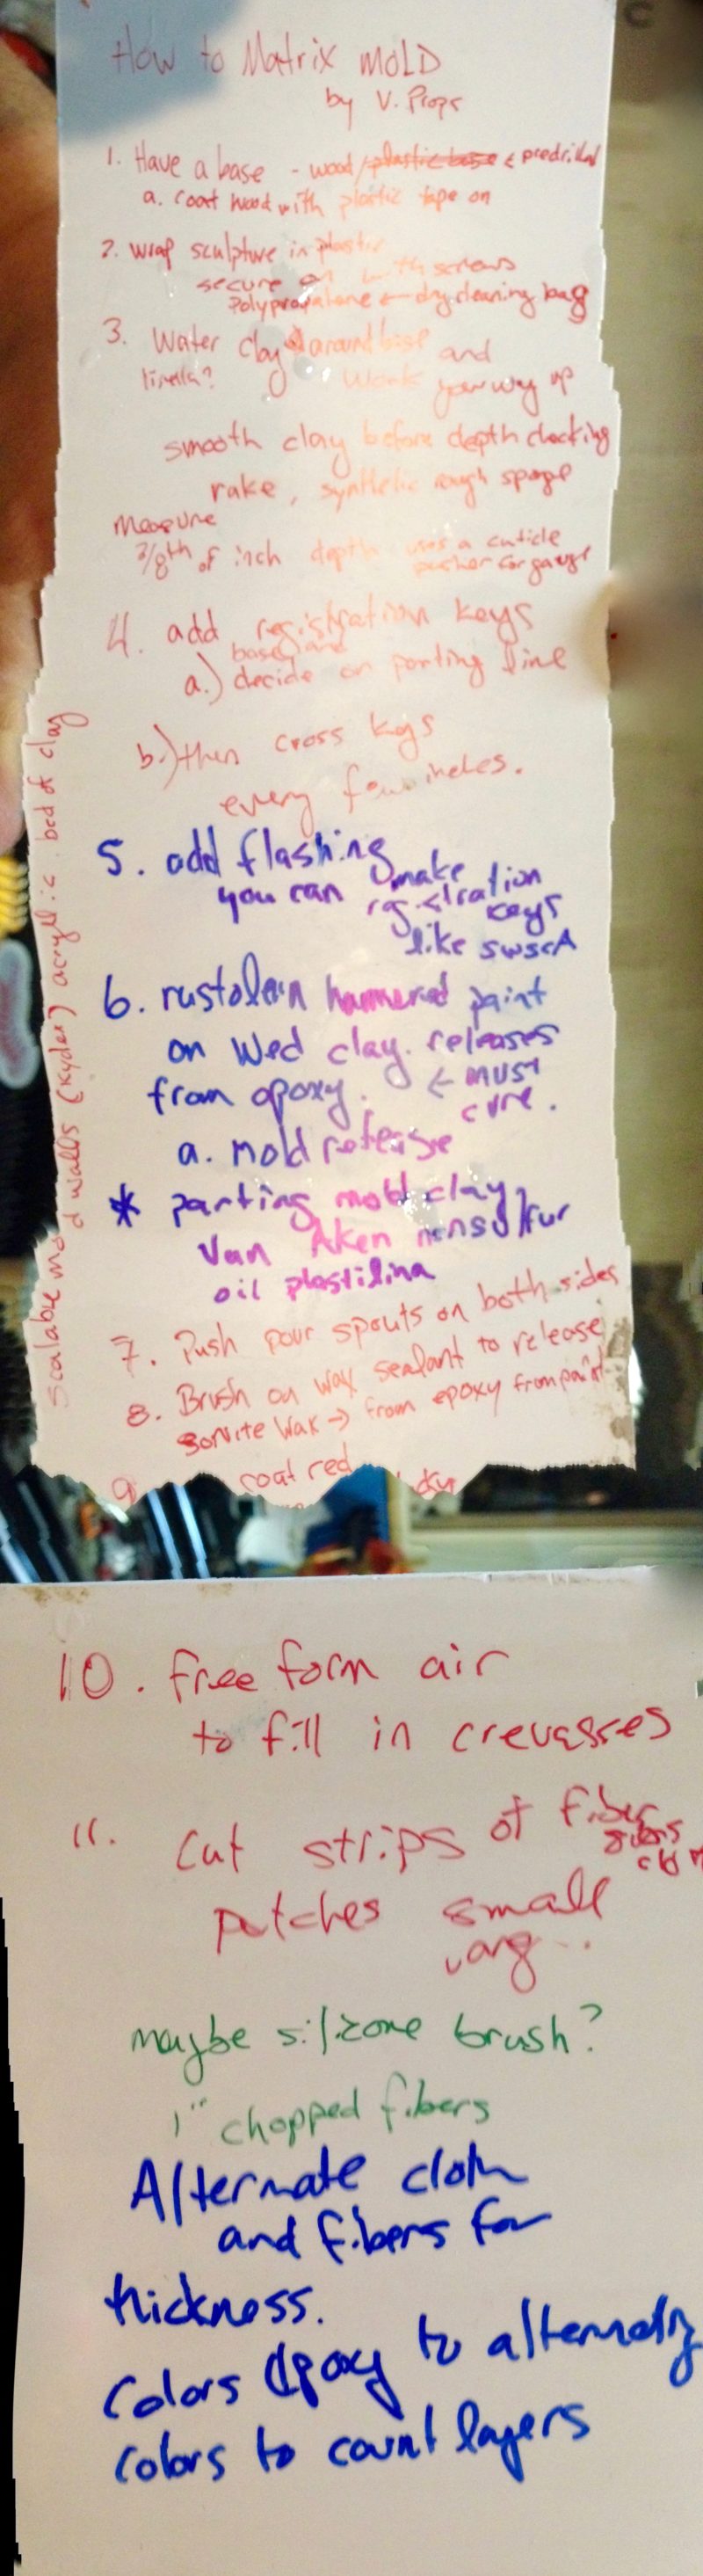
It began with small things—missing deadlines here, postponing mold refreshes there. But as it piled up, so did the shame. It became overwhelming, and some days, I couldn’t even bring myself to check my emails because I knew someone would rightfully be upset, and I just couldn’t face disappointing anyone again. I kept hoping I’d make it up to them tomorrow, but tomorrow never seemed to come. It felt like drowning, constantly letting everyone down while struggling to catch my breath.

Thankfully, I’ve sought help, and I’m committed to making things right with those of you who have outstanding orders.

Looking ahead, I’ve made some changes to prevent similar situations from happening again. We’ve turned off the ability to backorder products. This means PayPal won’t collect money for items we don’t have in stock. If an item is in stock, it’ll ship within a business day or so. If it’s not, and you need it for your build, just drop me a note. I’ll prioritize making more of that item and let you know when it’s ready.

I deeply apologize for the frustration and delays this has caused in your projects. It’s the last thing I wanted to happen.

Thank you for your understanding and patience as I work through this challenging time.

Best,

Chuck

Blade Runner 2049 Baseline Scanner Kit Instructions

Here are the instruction for how to assemble and finish your Blade Runner 2049 Replica Baseline Scanner Kit from Yay Monsters

Perfect Chocolate Chip Cookies

Perfect Chocolate Chip Cookies

(Makes 14 cookies)

Ingredients

  • 8.75 oz of bread flour
  • ½ teaspoon of baking soda
  • 14 tablespoons unsalted butter
  • 6.5 oz dark brown sugar
  • 2.25 oz granulated sugar
  • 2 teaspoon vanilla extract
  • 1 teaspoon salt
  • 1 large egg plus 1 large yolk
  • 2 tbs whole milk
  • 7.5 oz Ghirardelli Semisweet chocolate chips)
  • (Don’t add) 3/4 cup pecans or walnuts toasted and chopped.

*The how and why down below

Instructions:

  1. Whisk flour and baking soda in small bowl.
  2. Melt 10 tablespoons of butter in 10-inch skillet over medium high (5) heat. Continue to cook, swirling constantly until butter is dark golden brown and has nutty aroma.
  3. Transfer browned butter to large bowl and stir in remaining 4 tablespoons of butter until melted.
  4. Whisk in brown sugar, granulated sugar, vanilla and salt until incorporated. Set timer for 3:30 mins and whisk in milk, egg and yolk until smooth and no lumps remain (30 seconds).
  5. Let mixture stand for 3 mins. Set timer for 3:30 mins then whisk for 30 seconds. Repeat process two more times until mixture is smooth and shiny.
  6. Using a rubber spatula stir in flour mixture until just combined, about 1 minute. Then fold in chocolate chips and throw the pecans/walnuts in the trash.
  7. Adjust oven rack to middle position. Heat oven to 375 degrees. Line 2 baking sheets with parchment paper.
  8. Refrigerate dough until oven is up to temp. You want it close to or just below room temp so it’s easier to ball up.
  9. Working with 2.5 oz (3 tbs) dough at a time, roll into balls and space them 2 inches apart on prepared sheets. (Dough balls can be frozen for up to a month. Bake frozen dough balls in 300 degree oven for 30-35 mins)
  10. Bake cookies 1 sheet at a time until golden brown and edges have begun to set but centers are still soft and puffy.  10-14 minutes (12 mins) , rotate sheet(s) halfway through baking.
  11. Transfer to wire rack and let cool.

* Baking is Making

In September of 2018 I wanted to make a really good chocolate chip cookie. It’s the iconic American cookie. You want something like the Nestle Tollhouse Cookie, but not as bland and cakey. I started with an America’s Test Kitchen recipe that made a decent cookie. I learned when you melt the butter, it’s water becomes more available to the flour- this creates more gluten which makes a chewier cookie (more on that later). Browning it, adds a deep caramel flavor and using two yolks, but only one egg white keeps them from becoming too cakey. These were good cookies, especially when fresh, but if you stored them for a day or two they lost their chewiness no matter what.

Make a better, always consistent, and permanently chewy cookie… (without getting fat). First I looked to Martha Stewart. Her recipe looked like it would produce a flat crispy cookie… but she did note that using bread flour would make a chewier cookie. This makes sense: all-purpose flour made from winter wheat rolls in at about 10% protein (aka gluten), and bread flour clocks in at 12%-14%. That was part of the equation. My wife credits her cooking prowess to her father, and Alton Brown., So I checked in with the Good Eats aficionado. He has what appears to be a more cakey recipe that requires a mixer- but he suggests that adding some whole milk and having a much higher brown sugar to white sugar ratio produces a chewier cookie. So after bunches of batches of testing I tinkered my way to the perfect chocolate chip cookie. (At least my four year old thinks so strongly enough that he argues with his classmates in pre-school).

P.S. Buy the good butter. I used to think butter is butter. It isn’t. If you have a choice between $1.75, $5.00, or $7.50- buy the $5.00 butter for these cookies, and the $7.50 if you’re making proper pasta sauce.

How to Matrix Mold Like Harrison Part 1

Notes on styrene, watching Twitch while casting.

Notes on styrene, watching Twitch while casting.

Harrison Krix has always been generous with his knowledge. When he did the Twitch Con Trophy he streamed his process on how to matrix mold.

I’ve watched it three times, but I finally took notes.

  1. Have a nice plywood base, or maybe a melamine board with pre-drilled holes. Cover it with polypropylene plastic (dry cleaning bags) and tape it down to protect it from the clay and epoxy resin.
  2. Attach your sculpture to the board and then wrap in plastic.
  3. Start building your water clay (Lizella because it’s cheaper than WED) blanket at the base and work your way up.
    • Smooth the clay before depth checking. Use a kidney rake, then a rough sponge, then another make up sponge.
    • Make sure you have a bed of at least 3/8″ if you are pressure casting. More if you have appropriate features. H uses a cuticle pusher to measure.
  4. Decide on a parting line. Start building registration keys. Add cross keys every few inches.
    • Clean up your keys so they don’t create undercuts. Smooth and actually apply some craft to them. The work you put in here, will pay dividends when demolding later.
  5. Add flashing. The 6″ aluminum flashing from home depot. You can key it like they do on SWSCA, but H doesn’t and hasn’t had a problem.
  6. Spray seal the clay with Rustoleum Hammered Paint. It creates a plastic like surface which makes clay removal much easier (think scrubbing). Let this cure before proceeding.
  7. Push in pour spouts (shipping tubes) into the clay and then brush on Sonite Wax. This is another mold release between the epoxy and (paint) clay.
  8. EpoxAcoat Red is the skinning layer. Let it cure until tacky, but not all the way. It will not bond with the other layers if it fully cures.
  9. Use Free Form Air to fill in crevices. This will make the fiberglassing easier without having to jam it into corners.
  10. Cut strips, small patches and large patches before you start glassing.
  11. Use Apoximite 102 to blend the Free Form Air and the EpoxACoat together. It will melt it together nicely. He uses a  chip brush. Someone suggested using a silicone brush so he could reuse it.
  12. He alternates between 1″ chopped glass and the fiberglass cloth. Bushes resin into the glass/cloth for 4 layers.
    • When he gets to the top (5th) coat, he adds dye so he can see how thick he is getting it visually.
    • Cures in 16 hours.

You can watch the master at work here: https://www.twitch.tv/volpinprops/v/88101253


Save

Save

Save

Save

Vacuform Machine: Introducing Khaleesi 1.0

I name the workstations in my shop after my favorite female characters of stage and screen.

It gives my friends a reference point when we’re crackin’ wise. So when my little pancake compressor died an untimely death, my upgraded compressor became Sarah Connor. When  I piped that compressed air to the clean room and each of the benches, that became… Skynet.


I decided the first major prop-making tool I needed in the way of infrastructure is a vacuform machine. and her name is: Khaleesi.

As far as building a vacuform is concerned in the real world you actually don’t need much. A buddy of mine, has had a flourishing business based on his vacuform, and his table has been in service making parts for about 15 years. I kid you not- it is a plywood board with a hole cut in it, some expanded metal sheet, foam weather-stripping attached to a shop vac as old as the hills on a pedal.

If you get lucky on craigslist, you can literally find an old oven for $30 bucks and slap together a functional table in less than a couple of hours for just a few sheckles.  There’s always a trade-off. It’ takes a lot of back-breaking work to pull parts and requires the development of a lot of skill and finesse.

1/4" PETG Clear Plastic

He pulled this quarter inch petg visor on it the other day.

While on the hunt for a better way, I ended up stumbling on Harrison (Volpin) Krix’s Flickr account. Between his two blogs and his various builds are a wealth of knowledge. Let me gush a bit- inspiring is an understatement.  His plans lead me over to Workshop Publishing’s Protoform Build plans which are a steal at $65. Buy them, they worth every penny and more.

Proto Form Vacuum from www.build-stuff.com

Proto Form Vacuum from www.build-stuff.com

Finally to cap it all off, just as I was confident enough to just start building- Stan Winston School of Character Arts decided to put on a webinar with Fon Davis in which you build a vacuform from scratch, design and build a Sci-Fi helmet.

How to Make a Sci Fi Helmet with Fon Davis

How to Make a Sci Fi Helmet with Fon Davis

I can not rave enough about this class. Fon was an amazing instructor.  Someday they will release the best of this class as a tutorial and here is the second testimonial of the day: worth the full asking price.

The vacuform machine Fon builds is smaller and made from hacked available parts. He emphasizes not spending alot of time building your machine, so that you can spend more time creating.

One of my fellow Watch & Chat alumni Chris Ellerby of VEX FX was kind enough to throw the plans into Google Sketch up.

Armed with all this…  Khaleesi’s Comin Yo!

Links that helped me:

Save

Save

Save

Save

Save

Save

Save

Save

Save

Save

Save

Save